How to machine a parametric MDF wall on your CNC: the complete workshop guide
Designing a parametric wall takes minutes. Cutting it cleanly on a CNC router — and ending up with a wall that looks sharp on a customer's living room wall — is where most projects go wrong. This guide covers the workshop side from start to finish, with MDF specifically: the cheapest and most forgiving material for painted walls, but also the one with two traps nobody warns you about (its edges and its dust). Everything below assumes you already have your DXF or G-code exported.
Why MDF is the right first material
MDF has no grain direction. A slat cut across the sheet behaves exactly like one cut along it — so your nesting can rotate parts freely to save material, something impossible with solid oak or even plywood.
It is perfectly flat and dimensionally uniform, which matters enormously on a wall made of dozens of parallel slats: any cupping in the board shows up as a wave in the finished wall that has nothing to do with your design.
And it is the cheapest sheet you can buy. For a first parametric wall, where you will almost certainly make a mistake somewhere, cutting it in MDF costs a fraction of cutting it in walnut.
The trade-off: MDF is heavy, it hates moisture, and its raw edge drinks paint like a sponge. Both problems are solvable — that is what the finishing sections below are for.
Choosing the right MDF: thickness and grade
18 mm is the standard for wall slats. It gives enough material for the relief depth, holds a screw at the mounting rail, and stays rigid over a 2.4 m length. Below 12 mm, tall slats start to bow between fixings.
For a deep relief, remember the rule: your maximum relief depth cannot exceed the panel thickness. If you want 40 mm of depth, you either use 40 mm stock, or you build the depth by stacking slats of different lengths on rails — which is how most parametric walls are actually made.
Standard MDF is fine for a living room or an office. Use moisture-resistant MDF (usually green-tinted) for a bathroom, a kitchen splashback area, or any wall on an exterior-facing surface where condensation is possible. It machines identically, it just costs more.
Avoid the very cheapest boards: low-density MDF crumbles at the edges of fine details and will not hold a crisp fluted profile.
Nesting: getting the most out of each sheet
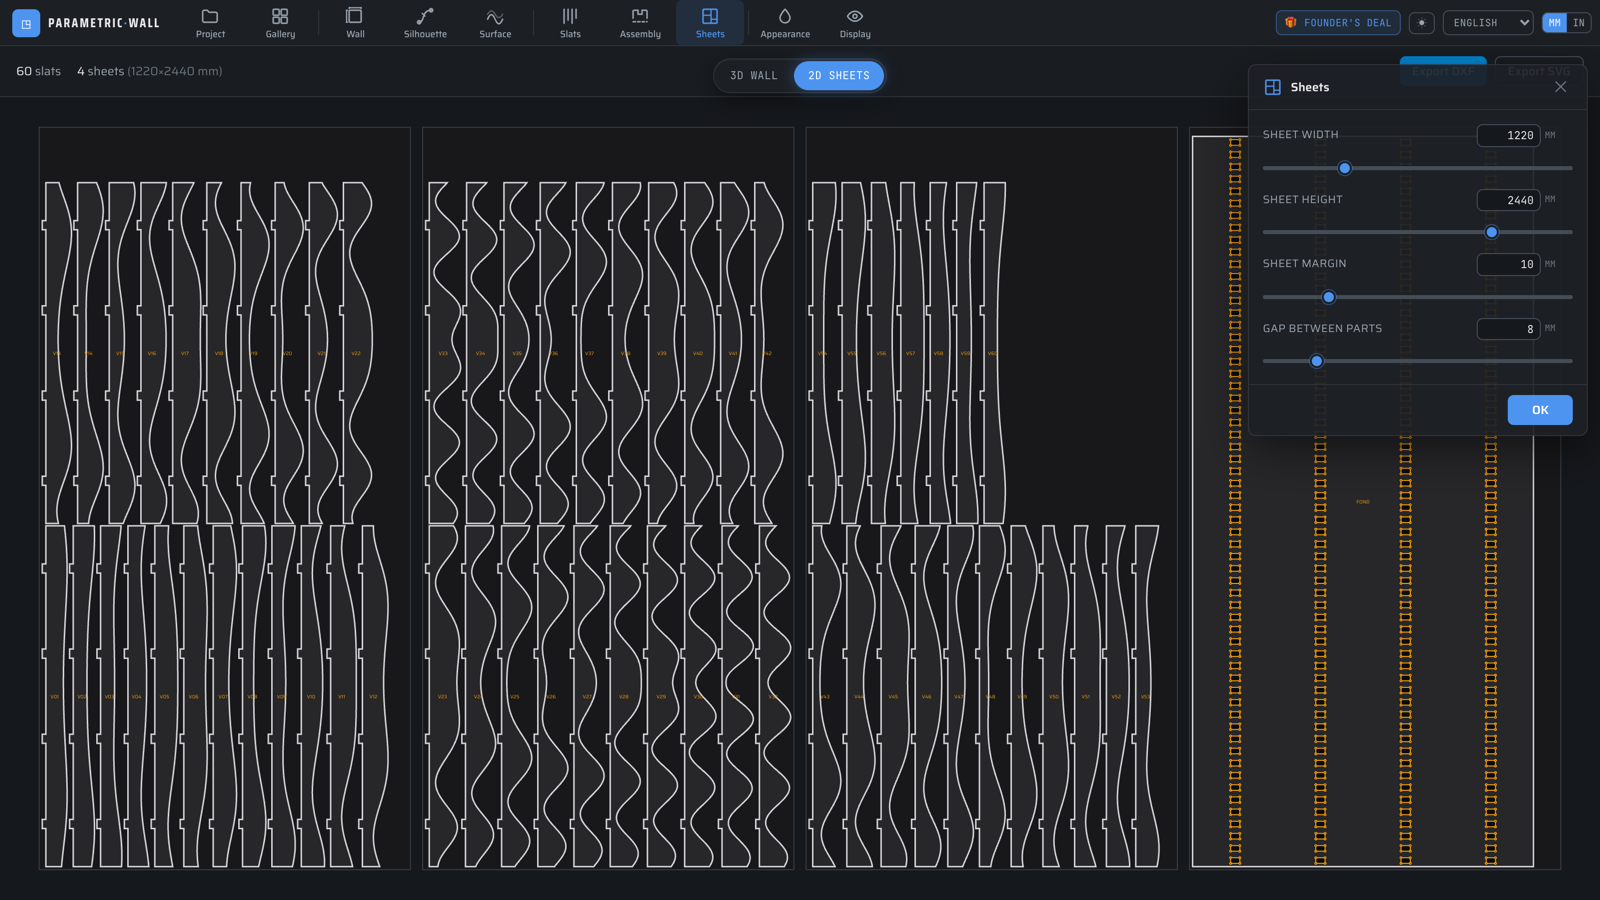
Set your real sheet size before exporting, not after. A standard sheet is 2440 × 1220 mm, but suppliers also sell 3050 × 1220 mm — and on a wall of long slats, that extra 600 mm can eliminate an entire joint.
Leave a margin at the sheet edge. The first and last few millimetres of a board are where clamps sit and where the material is least reliable. A 10 mm margin costs almost nothing and saves parts.
Keep a gap between parts equal to at least your bit diameter plus a millimetre. If two parts are closer than the cutter is wide, the machine physically cannot separate them.
The studio computes the nesting, the cut list and the number of sheets for you — check the sheet count before you buy your material, not after.
Workholding: the step that ruins the most parts
A parametric wall is made of long, narrow parts. As the cut progresses, each slat becomes a thin strip that is free to vibrate, lift or shift — and one part moving mid-cut ruins the piece and often the bit.
The reliable method is a sacrificial spoilboard with vacuum hold-down. It grips every part evenly across its whole surface, including small ones, and leaves the top face completely clear of clamps.
Without vacuum, use screws through the waste areas of the sheet — never through a finished part — plus clamps around the perimeter. Plan the screw positions on your nesting before cutting.
Double-sided tape works for small panels but becomes unreliable on long slats: the further the part, the more leverage it has to peel.
Which bit for MDF
A 6 mm two-flute upcut spiral is the sensible default for slat walls. Upcut clears MDF dust efficiently out of the slot, which matters because packed dust is what burns the material and dulls the tool.
Use a downcut or compression bit if the top surface finish is critical and you are not painting: upcut can leave slight fuzz on the top edge. On a wall that gets primed and painted, upcut is fine.
MDF is abrasive. It contains resin and fine fibres that wear carbide faster than solid wood — expect to change bits more often than you would cutting pine, and do not try to finish a whole wall on a bit that is already dull.
For a curved relief surface rather than straight slats, a ball-nose bit gives a smooth finish, but plan for a much longer cut time: it removes far less material per pass.
Depth per pass and cutting order
Do not try to cut 18 mm in one pass with a 6 mm bit. Take 6 to 8 mm per pass — three passes for an 18 mm board. Forcing full depth deflects the bit, which makes the cut wander and the edge taper.
Typical starting values for MDF with a 6 mm bit: 18 000 rpm, feed 1500 to 2500 mm/min. Adjust by sound: a screaming machine means the feed is too slow and you are burning; a chattering one means you are pushing too hard.
Cut internal features first — perforations for an acoustic panel, any pocket or engraved detail — while the sheet is still whole and rigid. Cut the outer profiles last, when nothing else remains to be done on that part.
Leave tabs on the final profile pass: small uncut bridges, typically 4 to 6 mm wide and 2 to 3 mm thick, that hold each part in the sheet until you remove it by hand. Without them, the last pass releases parts that immediately move.
Dust: the MDF-specific safety point
This is not an optional paragraph. MDF dust is far finer than sawdust and contains formaldehyde-based resin. It stays in the air long after the machine stops, and it is classified as a respiratory hazard.
Run dust extraction at the spindle, always. A shop vacuum with a dust shoe is the minimum; a proper extractor with a fine filter is better.
Wear a fitted P2/N95 mask or better during cutting AND during sanding — sanding produces the finest particles of all.
Ventilate, and let the air settle before you go back into the room without a mask. Fine MDF dust also coats everything, including your machine's rails and screws — clean them, or you will grind the dust into your linear bearings.
The MDF edge problem, and how to solve it
This is what separates an amateur-looking wall from a professional one. A cut MDF edge is porous end-grain: it absorbs paint unevenly and stays visibly rougher than the faces, however many coats you apply.
Sand the edges to 180 grit after removing the tabs. Break the sharp arris slightly — a crisp 90° corner never holds paint well.
Seal the edges before priming. Diluted PVA glue, a dedicated MDF edge sealer, or a shellac-based primer all work. Apply, let dry, sand lightly, repeat once on very absorbent edges.
Skip this step and the edges will drink your topcoat, look duller than the faces, and no amount of extra paint will fix it — you will have to sand back and start the finish again.
Priming and painting
Use a proper primer, not paint as a primer. On MDF, a shellac or solvent-based primer seals the surface far better than a water-based one, which raises the fibres.
Spray if you can. On a wall with dozens of slats and deep grooves, a brush leaves marks in every corner and a roller cannot reach the sides of the slats. A cheap HVLP gun pays for itself on the first wall.
Paint the slats BEFORE final assembly if they mount onto rails. Painting a finished slat wall means trying to reach between every slat — it is slow, and you will still miss spots.
Two thin coats beat one thick coat every time: thick coats sag in the grooves, which is exactly where the eye lands on a relief wall.
Assembly and mounting on the wall
Most parametric walls are built as slats fixed onto horizontal rails, not as one giant panel. Rails let you handle and transport the wall in sections, and they create the cavity that makes an acoustic panel work.
Dry-fit a section on the floor before fixing anything. Check the slat spacing against your design — an accumulated error of half a millimetre per slat becomes 25 mm across fifty slats.
Find the studs and fix the rails to them, not to plasterboard alone. An MDF slat wall is heavy: a 2.4 × 1.2 m panel in 18 mm MDF weighs well over 30 kg.
Start from a level line, not from the floor or the ceiling — neither is straight in a real room. Any deviation is far more visible on a wall of parallel lines than on a plain surface.
The mistakes that cost the most
Cutting before checking the sheet count. Discovering mid-job that you need a third sheet, in a batch you cannot match, is the most expensive mistake on this list.
Skipping tabs. It works until the one part that shifts at the end of a two-hour job — and that part is always the visible one.
Cutting full depth in one pass to save time. It saves minutes and costs you a bit, a part, and often the squareness of the edge.
Not sealing the edges. Everything upstream can be perfect; unsealed MDF edges will still make the finished wall look cheap.
Painting after assembly. Always doable in theory, always disappointing in practice.
From design to G-code, in one place
The studio handles the upstream half of this workflow: you set your wall dimensions and material thickness, shape the relief, and it slices the wall into slats, nests them on your real sheet size, computes the cut list and simulates the toolpath before anything is cut.
Export DXF or SVG for your CAM software, or G-code directly for GRBL and Mach3 if you want to skip CAM entirely. STEP is there when you need editable CAD solids.
Designing, the 3D preview and the machining simulator are free and unlimited — you can validate a whole wall before spending a euro on material.
Read next
Tools & guides
Ready to try it?
Design your MDF wall and export the files — free →